SpringBoot 整合 H2 数据库
添加依赖
<!-- 基本依赖 -->
<dependency>
    <groupId>org.mybatis.spring.boot</groupId>
    <artifactId>mybatis-spring-boot-starter</artifactId>
    <version>2.1.4</version>
</dependency>
<dependency>
    <groupId>com.h2database</groupId>
    <artifactId>h2</artifactId>
    <scope>runtime</scope>
</dependency>

<!-- 其它用到的工具 -->
<dependency>
    <groupId>org.springframework.boot</groupId>
    <artifactId>spring-boot-starter-web</artifactId>
</dependency>
<dependency>
    <groupId>org.projectlombok</groupId>
    <artifactId>lombok</artifactId>
    <optional>true</optional>
</dependency>
<dependency>
    <groupId>org.springframework.boot</groupId>
    <artifactId>spring-boot-starter-test</artifactId>
    <scope>test</scope>
</dependency>
然后是编写配置文件,这里使用嵌入模式
内嵌模式,就是把在应用中引入H2,启动应用的同时,会把H2数据服务也启动,应用中既包含了H2数据库的服务端,同时应用又作为客户端来连接H2数据库。
内存模式连接
内存模式就是数据库文件存在于内存中,没有持久化,当应用进程关闭时数据库与数据表会消失。为了独立环境,利用 SpringBoot 的 profile 特性来隔离不同模式的环境配置。
定制一个名称为 application-inner.yml 来测试内嵌模式。配置如下:
spring:
  datasource:
    #  驱动
    driver-class-name: org.h2.Driver
    # h2 内存数据库 内存模式连接配置 库名: mybatis
    url: jdbc:h2:mem:mybatis
    # 初始化数据表 DDL
    schema: classpath:sql/init.sql
    #  初始化数据 DML
    data: classpath:sql/data.sql
  h2:
    #    开启 console 访问 默认false
    console:
      enabled: true
      settings:
        #      开启h2 console 跟踪 方便调试  默认 false
        trace: true
        #      允许console 远程访问 默认false
        web-allow-others: true
      #  h2 访问路径上下文
      path: /h2-console
# 日志
logging:
  level:
    cn:
      felord: debug

# mybatis 配置
mybatis:
  mapper-locations: classpath:mapper/*.xml
  configuration:
    map-underscore-to-camel-case: true
#  type-aliases-package: cn.felord.mybatis.entity
#  type-handlers-package: com.alsritter.studyh2.type  # 扫描自定义的类型转换器
SpringBoot 项目 通过指定 --spring.profiles.active=inner 启动后,输入 http://localhost:8080/h2-console,进入H2数据的控制台
或者在主 yml 文件
spring:
  profiles:
    # 生效的配置文件  如 application-inner.yml 则 为inner
    active: inner
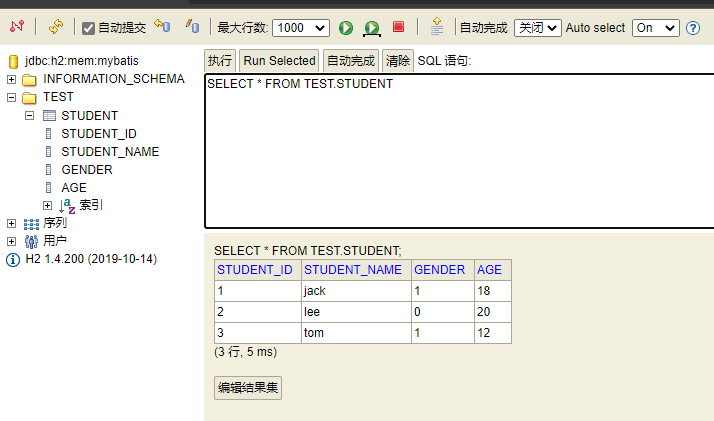
测试 SQL
上面的 init.sql
drop schema if exists `test`;
create schema `test`;
use `test`;
DROP TABLE IF EXISTS `student`;
CREATE TABLE `student`
(
    `student_id`   int(10) unsigned NOT NULL AUTO_INCREMENT,
    `student_name` varchar(1024)    NOT NULL,
    `gender`       tinyint(1)       NOT NULL,
    `age`          int(3)           NOT NULL,
    PRIMARY KEY (`student_id`)
);
上面的 data.sql
insert into test.student values (1,'jack',1,18);
insert into test.student values (2,'lee',0,20);
insert into test.student values (3,'tom',1,12);
创建实体
@Data
public class Student {
    private Integer studentId;
    private String studentName;
    private GenderType genderType;
    private Integer age;

}
@Data
public class Stu {
    private Integer studentId;
    private String studentName;
    private GenderTypeEnum genderType;
    private Integer age;
}
编写枚举
编写枚举用来接收参数
public enum GenderType {
    /**
     * Female gender type.
     */
    FEMALE,
    /**
     * Male gender type.
     */
    MALE,
    /**
     * Unknown gender type.
     */
    UNKNOWN
}
public enum GenderTypeEnum {
    /**
     * female.
     */
    FEMALE(0, "女"),
    /**
     * male.
     */
    MALE(1,"男"),
    /**
     * unknown.
     */
    UNKNOWN(2, "未知");

    private int value;
    private String description;

    GenderTypeEnum(int value, String description) {
        this.value = value;
        this.description = description;
    }


    public int value() {
        return this.value;
    }


    public String description() {
        return this.description;
    }
}
编写个类型转换器
因为上面使用了自定义枚举作为实体的参数,所以这里需要编写一个转换器来接收参数
@MappedTypes({GenderTypeEnum.class})
@MappedJdbcTypes({JdbcType.INTEGER})
public class GenderTypeEnumTypeHandler extends BaseTypeHandler<GenderTypeEnum> {
    @Override
    public void setNonNullParameter(PreparedStatement ps, int i, GenderTypeEnum parameter, JdbcType jdbcType) throws SQLException {
        if (jdbcType == null) {
            ps.setInt(i, parameter.value());
        } else {
            // see r3589
            ps.setObject(i, parameter.value(), jdbcType.TYPE_CODE);
        }
    }

    @Override
    public GenderTypeEnum getNullableResult(ResultSet rs, String columnName) throws SQLException {
        return getGenderType(rs.getInt(columnName));
    }

    @Override
    public GenderTypeEnum getNullableResult(ResultSet rs, int columnIndex) throws SQLException {
        return getGenderType(rs.getInt(columnIndex));

    }

    @Override
    public GenderTypeEnum getNullableResult(CallableStatement cs, int columnIndex) throws SQLException {
        return getGenderType(cs.getInt(columnIndex));
    }

    private GenderTypeEnum getGenderType(int value) {
        Class<GenderTypeEnum> genderTypeClass = GenderTypeEnum.class;
        return Arrays.stream(genderTypeClass.getEnumConstants())
                .filter(genderType -> genderType.value() == value)
                .findFirst().orElse(GenderTypeEnum.UNKNOWN);
    }
}
编写 Mapper
@Mapper
public interface StudentMapper {

    List<Student> findAll();

    List<Stu> findAllStu();

    int saveStu(Stu stu);

    int saveAutomaticStu(Stu stu);
}
<?xml version="1.0" encoding="UTF-8" ?>
<!DOCTYPE mapper PUBLIC "-//mybatis.org//DTD Mapper 3.0//EN" "http://mybatis.org/dtd/mybatis-3-mapper.dtd" >
<mapper namespace="com.alsritter.studyh2.mapper.StudentMapper">
    <resultMap id="StudentMap" type="com.alsritter.studyh2.entity.Student">
        <id column="student_id" property="studentId"/>
        <result column="student_name" property="studentName"/>
        <result column="gender" property="genderType" typeHandler="org.apache.ibatis.type.EnumOrdinalTypeHandler"/>
        <result column="age" property="age"/>
    </resultMap>


    <resultMap id="StuMap" type="com.alsritter.studyh2.entity.Stu">
        <id column="student_id" property="studentId"/>
        <result column="student_name" property="studentName"/>
        <result column="gender" property="genderType" typeHandler="com.alsritter.studyh2.type.GenderTypeEnumTypeHandler"/>
        <result column="age" property="age"/>
    </resultMap>
    <insert id="saveStu">
        insert into student (student_name, gender, age)
        values (#{studentName},
                #{genderType,javaType=com.alsritter.studyh2.enums.GenderTypeEnum,jdbcType=INTEGER,typeHandler=com.alsritter.studyh2.type.GenderTypeEnumTypeHandler},
                #{age})
    </insert>
    <insert id="saveAutomaticStu">
        insert into student (student_name, gender, age)
        values (#{studentName}, #{genderType,javaType=com.alsritter.studyh2.enums.GenderTypeEnum,jdbcType=INTEGER}, #{age})
    </insert>

    <select id="findAll" resultMap="StudentMap">
        select *
        from student
    </select>
    <select id="findAllStu" resultMap="StuMap">
        select *
        from student
    </select>
</mapper>
连接数据库
输入 http://localhost:8080/h2-console,进入H2数据的控制台
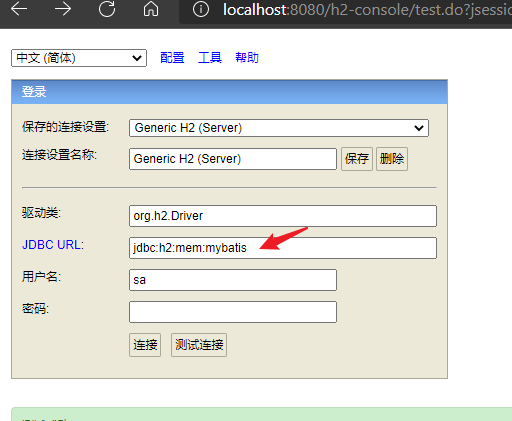
这里按着上面 application.yml 配置的 spring.datasource.url 来设置,不要用默认值,然后就能进入数据库界面了